

Ff7 Biker Boy Trophy Guide
Final Fantasy Seven Remake Trophy Roadmap
Introduction
Welcome to the Final Fantasy 7 Remake Trophy Guide! This guide applies to both the Intergrade PS5 version & the original PS4 Remake version.
Terminal Fantasy Vii Remake is the starting time part in a serial of Remakes. Information technology features the Midgar section of Final Fantasy VII merely this has been vastly expanded with new activities and side quests. The platinum trophy basically wants yous to proceeds 100% game completion. Except for Accessories, Armor, and Materia you lot must find all other collectibles and exercise all 26 side quests. A minimum of two playthroughs is needed. Beat out the game in one case to unlock hard difficulty, then beat it again on hard. Zero is missable considering there's Affiliate Select functionality after the story, allowing y'all to go dorsum everywhere. Note that if you platinum the PS4 version first yous tin can sync your salvage to the PS5 Intergrade version (from title screen) and information technology will autopop all trophies including platinum.
Step 1: Piece of cake Difficulty 100% Playthrough – Side Quests, Collectibles (Music Discs, Weapons, Johnny Incidents, 3 Dresses), Chapter-specific Trophies
For the outset playthrough option whatsoever difficulty (Easy is recommended, but information technology doesn't thing). Hard difficulty is not available from the get-go, which means 2 playthroughs minimum. You unlock hard when beating the story on any difficulty. After finishing the story on any difficulty, you also unlock Chapter Select. And then zero is truly missable. Y'all can go back everywhere. Nonetheless, some chapters become on for 3 hours or more so if you miss something late into a chapter you would take to replay a lot of it. Since yous need 2 playthroughs minimum (1 easy to unlock hard, one on hard), you tin can also get missing things on the hard playthrough.
Your main priorities should be getting all Side Quests, trophy-relevant collectibles (Music Discs, Weapons, Johnny Incidents, 3 of 9 Dresses) and the semi-missable Chapter-specific trophies. And so basically a 100% completion playthrough.
Side Quests:
- They go marked by a green icon on the map. In that location are 26 of them but you can only go 24 on the get-go playthrough. That's because in Chapter 9 some quests cancel out each other. The missing two you must do via Affiliate Select after the story. Refer to the Last Fantasy VII Remake Walkthrough & Side Quests for a listing of all Side Missions, their locations and when they go bachelor.
- In Chapter 9 become for the Side Quests The Party Never Stops & A Dynamite Torso and Non The Price of Thievery & Shears' Counterattack. The reason being that The Party Never Stops counts as a Johnny Incident. Doing The Price of Thievery would lock you lot out of this quest and then you'd miss the trophy for all Johnny Incidents. These quests are based on your Affiliate ix Choices. As shortly as you lot attain the playground with Aerith in Chapter 9, brand a transmission salvage and follow the choices outlined in The Party Never Stops Requirements.
- On the World Map (Touchpad) you tin can press
 to see a list of Side Quests in a given chapter. This way y'all know if yous completed all earlier moving on. Side Quests are only in Chapter 3, 8, nine, 14.
Collectibles:
- You merely need 3 types for trophies. For an all in one guide that besides lists optional item pickups (which you can ignore), refer to Last Fantasy 7 Remake Collectible Guide.
- Music Discs are music beingness played by Merchants, Vending Machines and some NPCs. Encounter Final Fantasy 7 Remake All Music Disc Locations.
- Weapons are plant in Chests, bought at shops and stolen from enemies. Come across Final Fantasy 7 Remake All Weapon Locations.
- Johnny Incidents are 5 sequences to exercise with a graphic symbol called Johnny (his side quests and discovery events). Brand sure in Affiliate 9 you go for Side Quest The Party Never Stops, it counts as a Johnny Incident and is semi-missable. See Final Fantasy VII Remake All Johnny Incident Locations.
- Dresses are based on what dress you tell Tifa to wearable in the Discovery Consequence of Chapter three (Tifa Wearing apparel), how many Side Quests you practise in Chapter viii (Aerith Dress), and how many Side Quests yous do in Chapter 9 (Cloud Apparel). There are 9 dresses (3 per grapheme) but you can only go 3 on the showtime playthrough! Run into Terminal Fantasy Seven Remake How to Get All Dresses.
Brand sure you consummate all Side Quests in Chapter 3 to unlock a purple "Discovery Consequence" at your room. Do this issue and tell Tifa to clothing the Sporty or Exotic wearing apparel (2nd or 3rd dialogue pick)! DO NOT Option THE MATURE Wearing apparel! Your choice here decides what dress Tifa will wearable in Affiliate 9! The Mature clothes is better reserved for your difficult playthrough outlined in Footstep 3 (if you picked Mature, yous'll have to redo Chapter 3 Side Quests on Hard or replay Chapter 3 one more than time via Chapter Select later). With Aerith you should get the Red Clothes for having washed all Side Quests in Chapter 8. With Deject you lot should get the Black/Blue Dress for having done The Party Never Stops in Chapter 9.
"Semi-Missable" Chapter Trophies (can still get them via chapter select after story but this requires replaying the chapter):
- Chapter 3 – Heavenly Dart Actor
- Affiliate 4 – Biker Male child
- Chapter 6 – Cleanup Crew
- Chapter 7 – In Lockstep
- Affiliate 8 – Crate Annihilator
- Chapter 9 – Sultan of Squat
- Chapter 9 – Dancing Queen
- Chapter 9 – Returning Champion
- Chapter 14 – Whack-a-Box Wunderkind
- Chapter 14 – Peeress of Pull-Ups
- Affiliate 14 – Divine Gratitude
All of this may seem a bit much at offset glance, just don't worry! The game is very linear and basically everything is in plain sight. Nothing is super hidden and the semi-missable trophies are mostly tied to minigames. If you reach a minigame information technology will have a trophy for it (all minigames do). But play thoroughly, get what you can and mop up the residuum in chapter select or on your hard playthrough. Don't worry about Battle Intel Reports or Enemy Skills only yet, those are better completed afterward the story.
Stride 2: Chapter Select to Chapter 9 for the missing 2 Side Quests & grind XP / AP in Colosseum
Afterwards the story y'all go access to Chapter Select and Hard Difficulty. You also earn twice every bit much XP and three times as much AP in Affiliate Select now.
Select Chapter 9 and practise the two side quests you didn't get on your first playthrough The Price of Thievery & Shears' Counterattack. Assuming you did all other side quests on the get-go playthrough you will unlock the trophy for all quests now.
After this, jump to the Chapter 14 Colosseum for grinding out level fifty and maxing out all 12 Magic Materia (you need these for the Battle Intel Reports). Set the difficulty to Classic (in Game Options) and so it plays the Colosseum for you without any push button input. Doing this in the Chapter 14 Colosseum is faster (because here you have 3 party members to level up more Materia simultaneously) instead of Chapter 9 Colosseum (there you only have 2 characters and then less constructive for leveling Materia). Complete all your remaining Battle Intel Reports, there are xx full. See Final Fantasy VII Remake All Battle Intel Reports & Final Fantasy VII Remake All Materia Locations.
Stride 3: Difficult Difficulty Playthrough, Hard sectional Trophies, Next three Dresses
Use Chapter Select to replay all capacity on Hard difficulty (  > Organisation > Chapter Selection). Everything carries over. All your equipment, grapheme level etc. from your starting time playthrough is available from the start in Hard Style, and then it'south like a New Game Plus. However, you can't apply any items at all on Hard. Refer to bays "Hardened Veteran" for tips and best character builds.
This fourth dimension you'll want to do a minimalistic playthrough and ignore all side quests and side activities. There are several Hard exclusive trophies considering some enemies that are linked to trophies are only available on Hard – practice these at present: Chief of Mimicry , That's the Smell, Ultimate Weapon
 .
.
MAKE SURE YOU SKIP ALL POSSIBLE SIDE QUESTS TO GET THE Side by side 3 DRESSES! By not doing the Affiliate three Side Quests, yous won't get Tifa'south Discovery event and she'll automatically exist wearing the Mature dress. That's why you lot weren't supposed to pick it in Step 1. Non doing the Affiliate eight quests gives a new clothes for Aerith and not doing Chapter 9 quests gives a new ane for Cloud. That's 6/ix dresses done subsequently this playthrough. In Chapter three you lot'll need to do 1 Side Quest to advance the story, it doesn't matter which quest y'all exercise for this. All other Side Quests you can skip.
Step four: The last 3 Dresses
All you lot should accept left are the last 3 Bridal Dresses. Chapter Select to Chapter 3, pick your final Tifa choice in her discovery event (Exotic or Sporty). Cease Affiliate 3 and exit (make sure y'all play Affiliate iii to the end).
Use Chapter Select to skip alee to Chapter 8, practice three/6 quests and finish the chapter to get Aerith's last dress (it'southward safe to skip Chapters 4-7, your choice will carry over to Chapter 9 automatically).
In Chapter 9 practice the opposite quests yous didn't get on your first playthrough. And so continue playing to the end of Affiliate nine to unlock Cloud's last dress.
If yous missed a Dress refer to Final Fantasy Seven Remake How to Become All Bridal Outfits (Dresses).
Useful Tips, Tricks, and Guides:
- Concluding Fantasy Seven Remake Wiki & Strategy Guide
- Concluding Fantasy Vii Remake Intermission (Yuffie) DLC Trophy Guide & Roadmap
- Concluding Fantasy Vii Remake Walkthrough & Side Quests
- Final Fantasy 7 Remake – Dominate Guide (All Bosses)
- Final Fantasy VII Remake Hard Difficulty Guide, Tips & Tricks
- Final Fantasy Vii Remake – All-in-I Collectible Guide
Final Fantasy VII Remake Trophy Guide
For DLC Trophy Guides run across:
» Final Fantasy 7 Remake Intermission (Yuffie) DLC Trophy Guide & Roadmap
 | Master of Fate Earn all Terminal FANTASY VII REMAKE trophies. |  |
| Earn all other trophies in Terminal Fantasy seven Remake Function one to unlock Platinum (DLC and other VII Remake Parts not required). | ||
 | Onetime Gig Complete Chapter 1. |  |
| Automatic story-related trophy, cannot be missed – see Chapter 1 Walkthrough. | ||
 | Escape Artist Consummate Chapter 2. | |
| Automatic story-related trophy, cannot be missed – meet Chapter 2 Walkthrough. | ||
 | Mercenary Endeavors Complete Chapter three. | |
| Automatic story-related trophy, cannot be missed – see Chapter 3 Walkthrough. | ||
 | Night on the Town Complete Chapter 4. | |
| Automatic story-related trophy, cannot be missed – see Chapter 4 Walkthrough. | ||
 | Programme E Consummate Chapter 5. | |
| Automatic story-related bays, cannot be missed – come across Chapter 5 Walkthrough. | ||
 | Lights Out Complete Chapter six. | |
| Automated story-related bays, cannot be missed – meet Affiliate 6 Walkthrough. | ||
 | Trapped like Sewer Rats Complete Chapter 7. | |
| Automated story-related trophy, cannot be missed – encounter Chapter 7 Walkthrough. | ||
 | Reunited Complete Chapter 8. | |
| Automatic story-related trophy, cannot be missed – see Chapter 8 Walkthrough. | ||
 | Never the Bride Complete Chapter ix. | |
| Automatic story-related trophy, cannot be missed – come across Chapter 9 Walkthrough. | ||
 | Sewer Survivor Complete Chapter 10. | |
| Automatic story-related bays, cannot be missed – see Chapter 10 Walkthrough. | ||
 | Paranormal Investigator Complete Chapter xi. | |
| Automated story-related bays, cannot exist missed – encounter Chapter 11 Walkthrough. | ||
 | The Collapse Complete Affiliate 12. | |
| Automatic story-related bays, cannot be missed – encounter Affiliate 12 Walkthrough. | ||
 | Broken Dreams Consummate Chapter xiii. | |
| Automatic story-related bays, cannot exist missed – see Chapter xiii Walkthrough. | ||
 | Picking Up the Pieces Complete Chapter 14. | |
| Automatic story-related trophy, cannot be missed – meet Chapter 14 Walkthrough. | ||
 | The Pizza in the Sky Complete Chapter fifteen. | |
| Automated story-related trophy, cannot exist missed – see Chapter 15 Walkthrough. | ||
 | No Appointment Needed Complete Chapter sixteen. | |
| Automatic story-related trophy, cannot exist missed – see Chapter 16 Walkthrough. | ||
 | Emerging from Anarchy Complete Chapter 17. | |
| Automatic story-related trophy, cannot be missed – run across Affiliate 17 Walkthrough. | ||
 | Destiny'south Crossroads Complete Chapter xviii. | |
| Automated story-related trophy, cannot exist missed – see Chapter 18 Walkthrough. | ||
 | Warming Up Win a battle. | |
| Automatic story-related trophy, cannot be missed. This volition be the first bays you unlock, for defeating the first grouping of enemies at the commencement of the game. | ||
 | Weakened Resolve Exploit an enemy's weakness. | |
| Yous can view enemy's weaknesses by using the Assess power, automatically unlocked in Chapter three. One time you lot utilize Assess, the weakness will be shown on a popup-screen in the elevation right corner. You can besides look up weaknesses exterior of battle by pressing (Main Menu) > Enemy Intel (the ones you used Assess on have a magnifier symbol). Enemies are weak against a certain condition chemical element (Fire, Ice, Thunder, Wind). Using the right element volition unlock the bays. For example, the weakness of the start Boss "Scorpion Sentinel" is Thunder. So you lot could use Barret's Thunder Magic to become the trophy in the first mission. | ||
 | Bonds of Friendship Complimentary a bound ally. | |
Some enemies will occasionally bind your political party members with unblockable attacks. If your grapheme is bound and unable to human activity, apace switch to a dissimilar character and attack. This volition free the bound political party member and unlock the trophy. For instance, you can do this against the very outset boss "Scorpion Sentinel". When you stand in front of it, it will sometimes grab you and agree y'all in the air. Press  / /  to switch to the other party member and attack before it finishes its grapple sequence. Odds are this will come up naturally over the form of the game. to switch to the other party member and attack before it finishes its grapple sequence. Odds are this will come up naturally over the form of the game. | ||
 | Staggering Start Stagger an enemy. | |
| Automatic story-related trophy, cannot be missed. When yous assail an enemy plenty times they volition "stagger" (=getting stunned). You can do this as early as the first guard dog you encounter. Over the course of the story you will automatically stagger hundreds of enemies. | ||
 | Music Collector Collect 3 music discs. | |
| See trophy "Disc Jockey". | ||
 | Gotta Starting time Somewhere Complete a quest. | |
| Run into trophy "All-time in the Business". | ||
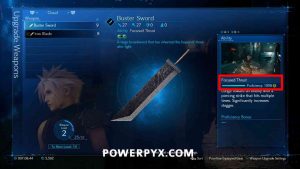
 | My First Power Max out a weapon's proficiency. | |
To max out a weapon's proficiency you must use its unique combat ability in boxing many times. Each utilize levels up the proficiency. During combat, assail enemies with  to increase your ATB gauge. When you accept at least ane ATB bar, press to increase your ATB gauge. When you accept at least ane ATB bar, press  to open the Command Carte du jour > Abilities > select weapon-specific ability. For example, Buster Sword = Focused Thrust, Iron Blade = Triple Slash. to open the Command Carte du jour > Abilities > select weapon-specific ability. For example, Buster Sword = Focused Thrust, Iron Blade = Triple Slash. To view which combat ability is tied to which weapon and what your proficiency is: press » Final Fantasy 7 (VII) Remake – All Weapon Locations Note: information technology doesn't count Cloud's starting weapon "Buster Sword". You can get it with his 2d obtained weapon "Iron Bract". | ||
 | Materia for Beginners Level up an orb of materia. | |
| Materia are the magic spells you find and purchase throughout the game (e.1000. Burn down, Healing etc). To level up a materia yous demand to earn AP with it (basically the XP for your magic spells). You lot proceeds AP from every combat encounter. Actively using a Magic Spell levels information technology up faster, merely you always become AP for every battle even if you don't use it. So simply accept the same Materia equipped for a while and this should unlock at some indicate in Chapter 3. To equip Materia, printing | ||
 | My First Summon Invoke a summon. | |
You unlock your commencement Summon (Ifrit) automatically in Chapter three, cannot be missed. Yous will receive a tutorial prompt almost this. Once you lot take information technology, equip it by pressing > Materia & Equipment > Select Character (east.grand. Cloud) >  Materia > press Materia > press  to select the Summons Slot (it's the slot furthest right on your weapon). The summon can merely exist used during certain encounters such as bosses. The kickoff opportunity is in Chapter iv when you fight 2 Sweepers (big bipedal robots). You'll get another tutorial for information technology and then and a purple bar volition charge up on the right side of the screen. One time the purple bar is filled, press to open up the Control Menu and select Summons at the bottom. The trophy pops instantly when selecting this option. to select the Summons Slot (it's the slot furthest right on your weapon). The summon can merely exist used during certain encounters such as bosses. The kickoff opportunity is in Chapter iv when you fight 2 Sweepers (big bipedal robots). You'll get another tutorial for information technology and then and a purple bar volition charge up on the right side of the screen. One time the purple bar is filled, press to open up the Control Menu and select Summons at the bottom. The trophy pops instantly when selecting this option. » Final Fantasy 7 (VII) Remake – All Summons | ||
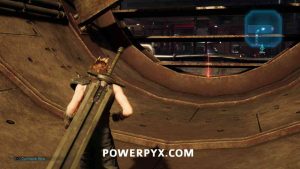
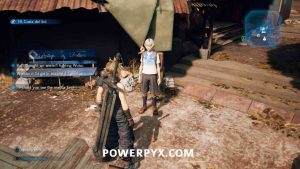
 | Biker Boy Become praised past Jessie at the end of the motorcycle mini-game. | |
 Chapter iv / Motorcycle Mini-Game (very beginning of chapter) This trophy is based either on how much health you finish the Wheel Sequence with (at least 80%) or on how many attacks you lot go hit with that slow you down (soldier's thrown bombs, drone's stupor, Roche'southward electricity on floor). Yous can only get hit by ii of those attacks that make you slow down. If you get striking a tertiary time Jessie says "Hit the breaks if y'all cannot avoid attacks" which voids the trophy. But effort not to get striking and not taking damage. This is best done on easy difficulty. The Wheel Sequence takes identify at the very start of the chapter and lasts around 10 minutes. Get-go yous drive in a tunnel where some enemies on bikes and drones will attack y'all. You can accelerate with Later on yous go out the tunnel y'all volition exist chased by Roche, the Cycle Boss in this mini-game. He is the only tricky part and on the start playthrough you volition likely get hit a lot by him and miss the trophy because of that. He switches betwixt a flurry of multiple ranged attacks (block with On the first playthrough of the chapter you will probably miss this bays. Either go on a Salve Game at the end of Chapter 3 and then y'all tin can reload and repeat immediately, or do it via Chapter Select subsequently the story. | ||
 | Heavenly Sprint Player Rise to the summit of the Seventh Sky darts leaderboard. | |
| Chapter 3 / Objective: Talking Strategy / Surface area: Residential Expanse After you rescued Johnny in Affiliate three yous will become back to Seventh Sky Bar with Tifa. At this point the story objective forces you to use the Darts Minigame to laissez passer fourth dimension. This is where you can get the trophy. If you missed this you tin replay Chapter 3 via Chapter Select afterward the story (you lot besides come back to the bar again in Chapter 4). To crush the leaderboard highscore you must win the Darts Minigame in 7 throws or less (6 throws beingness the bare minimum possible). The tape is eight. Getting it in 8 throws won't unlock the trophy, information technology has to exist 7 to beat the leaderboard. You need to articulate 301 points total to win. The easiest method is to brand 5 throws in the bullseye (5 x 50 = 250 points), one throw in T17 (3 ten 17 = 51 points). This way you can finish in vi darts, allowing yous to mess upward ane throw and even so get information technology in seven total. You don't even need to hitting the red center of the bullseye, hitting the green band around it nonetheless gives fifty points. On each throw the cursor will be shaking. Put the cursor over the bullseye and steer confronting the cursor shake (so if you detect the cursor pulling to the right y'all very slightly pull left to keep it centered). When the cursor narrows down to a yellow circle yous make your throw – it will striking exactly where you're aiming. So basically y'all demand to get two things right: balance the cursor wobble and have perfect timing. You only have 2 opportunities per dart to take a perfectly narrow cursor. Always throw on the 2nd opportunity. It's better to ignore the 1st opportunity and balance out the cursor wobble instead to make it stay in the heart. If y'all mess upwardly you can pause and quit the minigame immediately to retry information technology. Y'all don't demand to finish information technology every time, that would only waste matter time. It takes quite a lot of exercise only y'all tin can retry as often as yous want. | ||
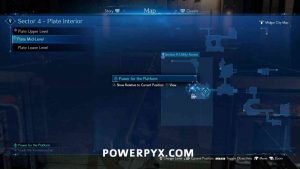
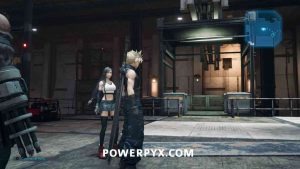
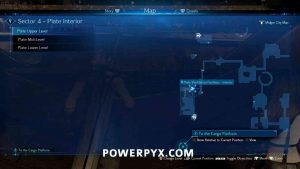
 | Cleanup Crew Obtain the Chocobo & Moogle materia. | |
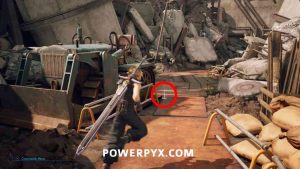
| Chapter 6 / Objective: Ability for the Platform / Area: Plate Mid Level (Department H Utility Access) In Chapter vi when you climb by the wall with big fans that blow out air, Tifa volition brand a comment that she spotted something backside ane of the fans and a regal "Discovery" icon is added on the map. Y'all won't be able to accomplish this right away. Afterward you render from turning off all 3 Sunday Lamps you are supposed to utilise the big cargo elevator. But instead of doing and then, head west from the cargo elevator to find a smaller elevator (direction where yous had to climb past some fans that accident out air). These ii screenshots show the lift location: Employ the small elevator and it will have y'all to the side where the fans are. In the showtime room at that place you find green command panel. Activate it to trigger a ane minute timer. You now accept only 60 seconds to defeat all enemies in the next room and must hit the dark-green console by the exit when washed. This leads yous backside ane of the fans where you can pick up the "Chocobo & Moogle" Summon Materia. The two screenshots below show the detail location (the ruby glowing item): | ||
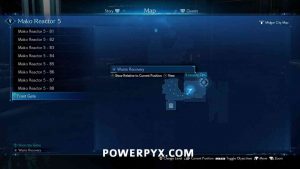
 | In Lockstep Bypass the delta-level security lock in Mako Reactor 5. | |
| Chapter vii / Discovery: Waste Recovery (Objective: Tempest the Gates) / Area: Front end Gate (Security Ops) When the story forces Cloud, Tifa, Barret to push 3 switches simultaneously in sync to open a door, there will exist a purple discovery marking on the map. Use the last where the imperial marker is. Then you take to apply the three switches once more and push button them in sync for 4 times in a row. It will open up the vault door to the Waste material Recovery room and unlock the trophy. You don't demand to concord on to the keycards you find throughout the level (those are not relevant for the trophy), and so experience free to spend them on the Airbuster terminals. The images below show the location of the final: | ||
 | Crate Annihilator Consummate all Normal difficulty Whack-a-Box challenges. | |
| Affiliate 8 – Side Quest: A Verified Hero Requirements: In Chapter eight complete Side Quests "Kids on Patrol" –> "A Verified Hero". In "A Verified Hero" Side Quest you become to play Whack-a-Box. This can exist repeated after the side quest as many times every bit you wish. In order to go this trophy y'all must beat the high score of 30,000 points. It'due south just one challenge, not multiple. This challenge consists of slap-up some boxes inside a time limit. There are 3 colors of boxes: Yellow is for points only, Blue is for points + ATB approximate, Cerise is for bonus time. The basic strategy for reaching 30,000 is that y'all must reach every bit many ruby time blocks as possible and not get stuck trying to clear all boxes in one expanse. The but two attacks you're going to utilize are belongings Be certain to equip the Atomic number 26 Blade weapon for Deject, it has the "Triple Slash" Ability. Use Triple Slash twice on those large 1500 point boxes that are blocking your way. Two uses are plenty to destroy them, which is the fastest method. From those 1500 betoken boxes only destroy those that are mandatory to advance, they take too long and give too few points and then don't get stuck with them. What you lot must do is connect the path from one crimson time box to the next equally fast as possible, doing a few | ||
 | Say It with Flowers Decorate the Foliage House with a floral organization. | |
| Automatic story-related bays, cannot be missed. Unlocks near the end of Chapter 8, just before the Reno boss. The story makes it mandatory for you to go flower picking with Aerith and bring them to the Leaf House (orphanage / school). The trophy will unlock afterwards into the Chapter during Objective "Requests for the Mercenary" when Side Quests become available. Regardless of whether or not you do any side quests, the story makes y'all get back to Aerith's business firm. On your way at that place, a woman in front of Leaf House volition stop y'all automatically and prove you the bloom arrangement, at which point the trophy unlocks. There is no way to miss this, so don't even worry well-nigh it. | ||
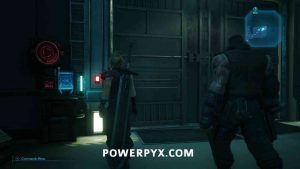
 | Summon Slayer Defeat a summon in battle. | |
| The earliest you can do this is in Chapter 8, during the costless roam section in the Slums (where side quests spawn). In that location you meet Chadley again, the guy who gave you Boxing Intel Reports in Chapter 3 already. Once you've completed Battle Reports 1-four for him, he'll unlock VR missions for you. Simply talk to Chadley to start the VR mission. The first one yous unlock is for defeating the Shiva Summon, which unlocks this trophy. Below is Chadley'south Location in Chapter 8: | ||
 | Sultan of Squat Complete all squat challenges. | |
| Chapter 9 – Side Quest: Called-for Thighs Beginning, you must complete Side Quest "Burning Thighs" in Chapter nine. There are 3 Squat Challenges full (Trainee, Apprentice, Pro). The first Squat Challenge (Trainee) is automatically completed as part of the side quest. After completing the quest, you can talk to Jay in the Gym for the Amateur claiming and so claiming Jules for the Pro Challenge. After you did all 3 the trophy unlocks. All you must do is printing | ||
 | Dancing Queen Received a gift from Andrea for existence a dance superstar. | |
| Chapter 9 / Objective: Aerith's Programme / Surface area: Honeybee Inn Afterward Aerith has changed into a new dress, she will take you to Honeybee Inn where you lot're supposed to become the approval of Andrea to audience for Don Corneo. At that place will be a forced dancing minigame. The dancing tutorial doesn't thing for it (but it does requite a Music CD Collectible if you lot get 10x "Great" rating, so practise information technology). For this trophy only the main trip the light fantastic with Andrea matters. It goes on for about iii minutes. All you do is press the buttons shown on screen when they start to glow (a hexagon around the button will narrow downwards and start glowing, that'south when you need to press it for a "Great" rating). To get this trophy yous must cease the Trip the light fantastic with a very high overall rating. I got 26 x "Bang-up" / 2 x "Good" / 0 ten "Bad" when the trophy unlocked. When you're doing it right, you will encounter Aerith clapping her hands to a higher place her head. If she'south applauding you'll go the trophy later Cloud puts on his dress afterward the dance. If Aerith makes a comment like "Well you tried" you have failed. It's highly recommended you make a manual save before the trip the light fantastic (every bit soon equally y'all enter Honeybee Inn). Because if y'all neglect you cannot echo the dance unless you reload a previous salve. Here are the required push presses: | ||
 | Returning Champion Emerge victorious from a colosseum sparring session. | |
| Chapter 9 / Objective: Underground Colosseum / Expanse: Wall Marketplace Later winning the Colosseum Tournament as role of the story (defeated Hell House dominate, unmissable), you can go back into the basement of the Colosseum and talk to the NPC at that place to get-go sparring sessions. Do the offset i that is 1 star difficulty and this trophy will unlock. | ||
 | Snappy Dresser Obtain iii conjugal candidate outfits. | |
| Encounter trophy "Dressed to the Nines". | ||
 | Dressed to the Nines Obtain all nine bridal candidate outfits. |  |
| » Terminal Fantasy seven (VII) Remake – How to Get All Conjugal Outfits (Dresses) | ||
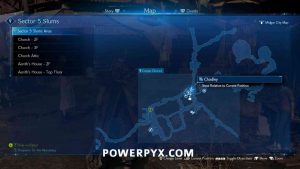
 | Whack-a-Box Wunderkind Complete all Hard difficulty Whack-a-Box challenges. | |
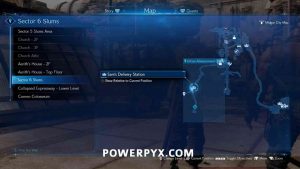
| Chapter fourteen / Objective: Intel Gathering / Area: Sector 5 Slums (Children'southward Secret Hideout) You can detect the Whack-a-Box challenge in Chapter 14, in the Children's Hideout of the Sector 5 Slums. It's in the exact same place where the Normal difficulty Whack-a-Box took place in Chapter 8 (Crate Annihilator trophy). You need to have played Side Quest "A Verified Hero" in Chapter 8, that's the quest that unlocked the Whack-a-Box minigame originally. Just similar with the Normal difficulty Whack-a-Box you need to reach xxx,000 points in the given time limit to get the trophy. It's merely really 1 challenge and not multiple, every 10,000 points gives a different advantage. Like before there are dissimilar colors of boxes (red = time, blue = ATB estimate, yellow = simply points). Go far your goal to get from 1 red gate to the side by side as fast equally possible. Getting the time boosts is the primal to win. Also use the Iron Blade's Triple Slash again on the big bluish boxes. 2 uses of that is plenty to destroy a big blue box very quickly. Just destroy the big blue boxes that are directly blocking your path, ignore the optional ones, and instead focus on the areas with many pocket-sized boxes close together. Hold | ||
 | Peeress of Pull-Ups Complete all pull-upwards challenges. | |
| Chapter fourteen – Side Quest: Wavering Center In Chapter 14, as presently as you can costless roam, return to the Gym in Wall Market (Sector 6 Slums) where the Squat Challenge took place in Chapter ix. There will be a quest giver in the gym for Side Quest "Wavering Heart". Completing this Side Quest automatically completes the showtime Pull-Upwards Challenge (Trainee level). Afterward this y'all need to talk to 2 other people in the gym – Jay for the Apprentice challenge and Jules for Pro challenge. Complete all 3 of them and the trophy will unlock. It's very similar to the Squat Challenges. All you exercise is press some buttons in a rhythm. The divergence this fourth dimension is that the push button combo y'all must press changes each round and then you need to readjust your button presses. The timing aspect is still the same as with Squats. The more successful pull-ups you do in succession, the faster you tin printing the buttons and build up more speed. When you get fatigued a button prompt shows up on screen and yous must smash this button quickly or else you fall downwardly. The trick to winning is to just practise information technology without falling down. Your opponents volition always fall down at some point, as long as you don't mess upward and build upwardly your speed, you will overtake them. | ||
 | Divine Gratitude Receive a letter from an angel. | |
| Chapter fourteen / Objective: Over the Wall / Area: Sector 6 Slums (Urban Advancement District) This trophy requires you to have done all side quests on your playthrough (all 24 of 26 possible quests, in affiliate 9 you tin can only become three/5 quests per playthrough so information technology'south impossible to do all 26 in 1 playthrough. It may exist enough to just go all quests in Chapter 14 but this is unconfirmed. Getting 24 quests in i playthrough will unlock it for certain). If you lot did the side quests then the Alphabetic character from the Angel will spawn at the stop of Chapter fourteen, thanking y'all for your services to the people. Picking upward that letter collectible unlocks the trophy. Information technology'due south a bluish glowing particular on the master path to the terminal objective in Affiliate fourteen, in plain sight and impossible not to see. This is after returning from the Sewers and turning in your last Side Quests. It'due south on the narrow path just before reaching the wall with "Avalanche" sprayed on it. If you go to the wall you'll also get a Point of No Return warning and tin can notwithstanding plough dorsum. For all Side Quests see » Final Fantasy 7 (VII) Remake Walkthrough (All Side Quests). | ||
 | The Johnny Feel Witness all Johnny-related incidents. | |
| » Final Fantasy 7 (7) Remake – All Johnny Incident Locations » Final Fantasy 7 (7) Remake – All Collectible Locations (including Johnny Incidents) | ||
 | Best in the Business Complete all quests. | |
| There are 26 Side Quests full. You cannot get all of them on the kickoff playthrough. Just 24 of 26 are possible on the first playthrough. The reason being that in Affiliate ix ii side quests The Party Never Stops, A Dynamite Body cancel out The Price of Thievery, Shears' Counterattack (and vice versa). Depending on your choices in Chapter 9 you volition get one or the other. You HAVE TO become the missing 2 quests through Chapter Select. All Side Quests have Quest Givers with a green icon above their head. Simply the following Chapters contain Side Quests: Chapter 3, 8, 9, 14. Check the links below for pages to each quest (text, screenshots, video guides): » Terminal Fantasy 7 (7) Remake – All Side Quest Walkthroughs Chapter 3:
Affiliate viii:
Chapter 9:
Chapter xiv:
| ||
 | Disc Jockey Collect all music discs. | |
| » Final Fantasy 7 (Seven) Remake – All Music Disc Locations » Final Fantasy vii (VII) Remake – All Collectible Locations (including Music Discs) | ||
 | Edifice Character Achieve level 50 with a character. | |
| Level 50 is the level cap in FF VII Remake (highest level you can achieve). Later on the kickoff playthrough you unlock Chapter Select and earn twice and much XP. Besides equip the EXP Up Materia that you go from the Combat Simulator in Chapter 16. This way y'all get 4 times as much XP! You'll probably exist Level 30-forty if you did the first playthrough thoroughly. Employ Affiliate Select to jump to Chapter ix and play the Colosseum Fights. You tin put the game on Classic difficulty so the AI plays for yous and y'all tin become abroad and take a pause. Let it grind the Colosseum for you for a while and you lot'll be Level l in no fourth dimension! Even if you don't, you'll reach Level l shortly after starting your Hard Playthrough, and then this is basically unmissable on the path to platinum. You lot can check your grapheme level in the Chief Bill of fare (press ). | ||
 | Staggering Feat Deal 300% damage to a staggered enemy. | |
| In that location are three ways to increment an enemy'due south Stagger %. Using Tifa's Chi abilities (her default The best method is to vitrify Tifa twice in a row with Unbridled Strength to upgrade her Annotation: During Affiliate 18 there'due south a bike sequence with a dominate that you'll automatically stagger to more than 300% but this one doesn't unlock the bays! Yous take to utilize the legit method. | ||
 | Intelligence Agent Complete all boxing intel reports. | |
| » Final Fantasy seven (7) Remake – How to Get All Battle Intel Reports | ||
 | Weapons Skillful Learn all weapon abilities. | |
| » Concluding Fantasy 7 (Vii) Remake – All Weapon Locations & How to Go All Weapon Abilities » Final Fantasy seven (VII) Remake – All Collectible Locations (including Weapons) | ||
 | Master of Mimicry Learn all enemy skills. | |
| » Final Fantasy seven (VII) Remake – All Enemy Skill Locations | ||
 | That'southward the Smell Defeat a malboro. | |
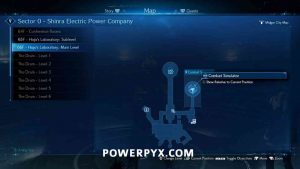
| In society to fight a Malboro, you need to stop the game to unlock Hard Mode. Then, you lot'll go a notification that new battles are available in the VR Simulator in Chapter 17 (practice not confuse with Chapter 16 Simulator, it'due south a new one). Load Chapter 17 and proceed a couple of minutes into it to get a cutscene with Chadley where he'll tell you he has new Hard-simply challenges for you. It's in the corridor immediately after the first enemy encounter in this chapter (Objective: A Way Out / Area: 66F Hojo's Laboratory: Main Level), run into location prototype below: The battle with the Malboro is the 5th round of the 13th challenge, named 'Three-Person Team vs. Monsters of Legend.' This is exclusive to hard difficulty and not available on lower difficulties. It costs 600 Gil to enter, which should exist entirely negligible at this stage of the game. The best team is Cloud, Tifa and Aerith. Cloud is obviously the strongest character, whilst Tifa is corking for building Stagger and Aerith is the all-time healer. The general loadouts and strategies as detailed in 'Hardened Veteran' should suffice hither, every bit this iteration of Malboro doesn't live up to the reputation of its companion in other Final Fantasy games. However, don't forget to equip at least one of your characters with the 'Enemy Skill' Materia so that you can learn Bad Jiff, a skill needed for the Chief of Mimicry bays. To get to Malboro, you first need to defeat a Bomb, a Tonberry, a Blazon-0 Behemoth and then a Bomb and Tonberry together. None of these should pose any threat at this stage if you lot're patient and keep your party'due south health up. The good thing near these fights being in the Simulator is that it replenishes 50% of your HP and MP after every boxing, meaning you lot can exist more liberal with your Healing Spells. Malboro himself is similarly easy. In fact, the most annoying role virtually this fight is that you accept to get hit by Bad Breath to acquire the Enemy Skill. Just stand in front end of the Malboro until information technology uses the assault and then heals upward. Once that'south done, you tin just attack it from behind every bit it only attacks out of its mouth with Bad Jiff, Acrid and Test Bite. Roll backside it and attack with Cloud, edifice upward the Stagger bar with Focused Thrust. If it turns around and attacks you, then either effort and roll around information technology to go along your assault or but bandy to Tifa to go behind it while information technology's engaged with Cloud, again using Focused Strike. Malboro can't face both characters at in one case and so hit it from both sides with a pincer movement, attacking it with the character who is backside until it turns around, and then bandy. Malboro has no weaknesses to magic, so Aerith should be your designated healer with Magnify-Cure and she should too have a maxed Cleansing Materia equipped and so she can employ Esuna on any character who does happen to be hit by Bad Breath. If y'all're on height of the fight, y'all can use her to attack Malboro from distant with normal attacks or Ray of Judgment as he can merely attack from upwardly close, merely her priority should e'er be to heal while the other ii do the damage. Malboro will go downwardly soon plenty and you'll be rewarded with this bays. | ||
 | Ultimate Weapon Defeat the Pride and Joy epitome. |  |
| The Pride and Joy Prototype is Final Fantasy VII Remake'south 'superboss'. You can fight it in the Shinra Combat Simulator in Chapter 17, same identify where you fight Malboro. It is merely bachelor on Difficult difficulty. You must as well have completed all Corneo Colosseum challenges in Chapter 9/fourteen and xiii Shinra Combat Simulator challenges in Chapter 17 (those you can all exercise on archetype/piece of cake). If you're missing the Aerith solo challenge in the Corneo Colosseum so reload Chapter nine and have the claiming IMMEDIATELY later on defeating Hell Firm. This is the merely time in the game that Aerith is available at the Colosseum. If you proceed too far, she will leave the political party. Location: load affiliate 17 (on difficult difficulty) and proceed a couple of minutes into it to go a cutscene with Chadley where he'll tell you he has new hard-only challenges for you. It's in the corridor immediately subsequently the start enemy run into in this chapter (Objective: A Way Out / Area: 66F Hojo'southward Laboratory: Main Level), see location image beneath: The Pride and Joy fight takes place in the fifth round of the 14th and final challenge, 'Three-Person Team vs. Height Secrets'. In a slightly baroque twist, Pride and Joy is arguably the easiest of the 5 rounds, it's the journey to that fight which is the hard function. You lot accept to face Shiva, Fat Chocobo, Leviathan, Bahamut (who summons Ifrit to assist him at half health) so Pride and Joy. The fourth fight in item is hands the hardest fight in the entire game. Luckily, your HP and MP are healed 50% between every round. A squad of Deject, Tifa and Aerith is highly recommended. A dedicated healer is essential (Aerith), whilst Cloud goes without saying and Tifa is cracking for increasing Stagger %, especially since the summons have the longest Stagger fourth dimension of any enemy. Deject: Tifa: Aerith: Brand sure two characters accept Elemental Materia linked to Ice Materia on their armor and Cloud & Tifa have a Headband equipped to prevent confronting Sleep. This is purely for the Shiva fight as she uses Slumber a lot and all of her attacks employ Water ice. This mode, you never demand to heal and can focus on attacking her to whittle downward her health as she likes to heal frequently. If you spend half the fight asleep or trying to heal, you'll never become anywhere. Magnify Materia linked with Cure Materia is the best option to heal your entire political party. The Magnify Materia causes your spell to heal everyone in the party and non just one. Assign information technology to Aerith equally she'southward the best healer. Information technology's best to have a Circlet Accessory on Aerith to increment her MP and Magic (which also boosts the healing effect). Alternatively, the Healing Carcanet is a expert choice. For all of these battles, the basic strategy remains the same. Only wail away on the enemies with Deject and Tifa, using Focused Thrust and Starshower to build the Stagger bar, and once it activates utilise Tifa'south The quaternary round is the truly hard office. Bahamut alone is a lethal plenty foe, never listen summoning Ifrit to bring together him once he hits half wellness. The problem is his use of Megaflare, which will instantly deal 9999 damage to all 3 characters. There are simply a few ways to survive this: Stagger him before he counts downward from v (unlikely), have the Reprieve ability from the Level half-dozen weapon cores which will go out you lot on 1HP, or bandage Manawall (Barrier Materia) which halves all damage taken (5000 instead of 9999 harm). Luckily, he has a short cooldown period after unleashing Megaflare then it gives yous enough fourth dimension for a Curaga. It'south worth saving Deject and Tifa's Limit Breaks for Ifrit when he spawns. He can exist a existent menace and quickly turn the tide against y'all if you're not careful, so taking him out is the top priority; Bahamut can wait. Luckily, he has fairly low HP, so one Ascension or Dolphin Flurry tin wipe out half his HP bar, or kill him entirely if yous've saved up both. Bahamut will then commencement counting down to another Megaflare, but he should exist running fairly depression on HP by this point and you should kill him with the tried and tested tactics before this happens. After getting through all this, Pride and Joy is a relief and actually quite easy. Similar to Malboro, the best bet is to become behind its legs and just keep attacking information technology to build the Stagger bar. Information technology will intermittently expel jets of burn down which volition harm yous, but not desperately. Its most annoying set on is Take hold of, where it grabs one of your characters, leaving them unable to move, and eventually uses Cruel Tackle to slam them to the ground and instantly kill them. The only way to stop it is to set on its manus long plenty then that it drops the character. What makes this fight piece of cake is that all of its attacks are close range, except Beam Cannon. Therefore, yous can go on Aerith out of the way and healing regularly while Cloud and Tifa pound it with physical attacks upwardly close. Fifty-fifty if 1 of them goes downwardly, she tin Raise from afar with very fiddling take chances of beingness interrupted (make sure yous have Revival Materia on all 3 characters, you lot tin can buy more than of it from the vending auto exterior the Combat Simulator). | ||
 | Hardened Veteran Complete all chapters on Hard difficulty. | |
| Hard difficulty is unlocked when you lot cease the game for the first time (on any difficulty). In hard mode enemies accept more wellness and bargain more harm. You can't use items at all, and benches only restore HP, not MP. However, after finishing the game once y'all practise gain 2x XP and 3x AP, significant yous should hitting Level 50 rapidly and meliorate Materia faster. For a list of combat tactics, best loadouts and other tips check the guide below. » Last Fantasy 7 (Vii) Remake Hard Difficulty Guide – Best Loadout, Tips & Tricks » Final Fantasy seven (7) Remake Boss Guide (Hard Difficulty) | ||
 . Drive up to the enemies and attack with
  +
+ 

For DLC Trophy Guides see:
» Final Fantasy Vii Remake Intermission (Yuffie) DLC Trophy Guide & Roadmap
 Special Thanks / Credits
Massive thanks to the following people for helping in the creation of this guide:
Darth_Krid = Difficult difficulty trophy info, various Wiki contributions, Side Quests
Archavia = Diverse info gathering

Ff7 Biker Boy Trophy Guide,
Source: https://www.powerpyx.com/final-fantasy-vii-remake-trophy-guide-roadmap/
Posted by: rodriguezandamers1993.blogspot.com
0 Response to "Ff7 Biker Boy Trophy Guide"
Post a Comment